Introduction to Spring MVC Framework
- Spring MVC is used to develop the web applications that uses MVC design pattern. By using Spring MVC we can build flexible and loosely coupled web applications.
- The MVC design pattern helps in seperating the business logic, presentation logic and controller logic.
- Models are responsible for encapsulating the application data.
- The Views render response to the user with the help of the model object .
- Controllers are responsible for receiving the request from the user and calling the back-end services.
Spring MVC will make application development faster, cost effective and flexible.
Advantage of Spring MVC Framework
- Clear separation of responsibilities because it implements MVC design pattern.
- Loose coupling among Model, View and Controller.
- Inbuilt front controller.
- Simplified Validation implementation.
- Simplified Exception Handling.
- Internationalization logic is simplified compared to other frameworks.
- Spring MVC provides a set of custom tags which are useful to implement presentation logic easily.
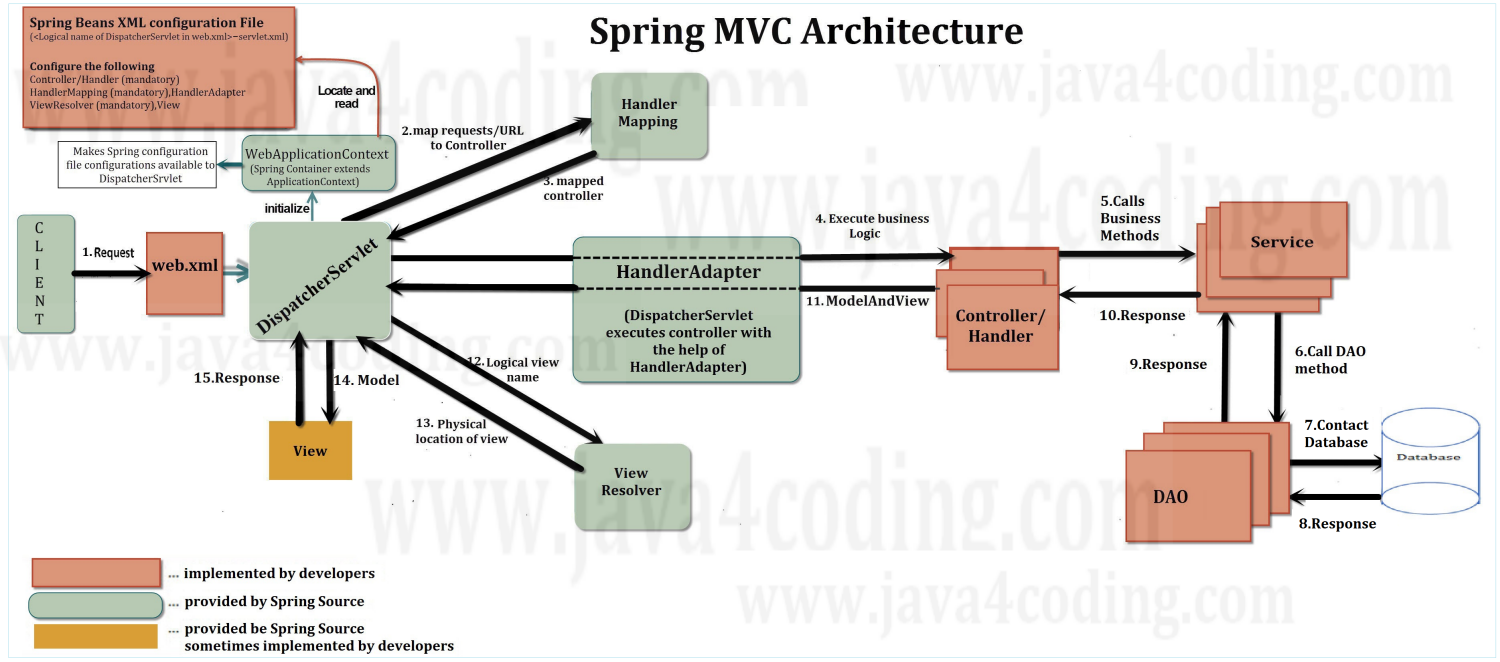
Spring MVC Flow
(Ex : Waiter (Hotel) )
1. Client(Browser) requests for a Resource in the web Application.
2. The Spring front controller i.e, DispatcherServlet first receives the request.
3. DispatcherServlet consults the HandlerMapping to identify the particular controller for the given URL.
4. HandlerMapping identifies the controller for the given request and sends to the DispatcherServlet.
5. DispatcherServlet will call the handleRequest(request,response) method on Controller. A Controller is developed by writing a simple java class which implements Controller interface or extends its adapter class.
6. Controller will call the business method according to business requirement.
7. Service class will call the DAO class method for business data.
8. DAO interacts with DB to get data.
9. DAO returns same data to service.
10. Fetched data will be processed according to business requirement and return results to Controller.
11. The Controller returns the Model and View in the form of Object back to the Controller i.e, DispatcherServlet.
12. The front controller i.e, DispatcherServlet then tries to resolve the actual View which may be JSP by consulting the View Resolver Object.
13. ViewResolver selected view is rendred back to the DispatcherServlet.
14. DispatcherServlet consult the particular view with the model.
15. View executes and returns HTML output to the DispatcherServlet.
16. DispatcherServlet will sends the output to the Browser.
Follow the below steps to create a simple Spring MVC example.
Step 1 : Create Web Project
Step 2 : Add Jar files to the project
Step 3 : Provide the entry of controller in the web.xml file
<web-app>
<display-name>Archetype Created Web Application</display-name>
<servlet>
<servlet-name>servletName</servlet-name>
<servlet-class>org.springframework.web.servlet.DispatcherServlet</servlet-class>
</servlet>
<servlet-mapping>
<servlet-name>servletName</servlet-name>
<url-pattern>/</url-pattern>
</servlet-mapping>
</web-app>
- The org.springframework.web.servlet.DispatcherServlet acts as the front controller for the application.
- This means DispatcherServlet receives each request and direct the request to appropriate controller.It is also responsible for directing the response from controller to appropriate views.
- The web.xml should be given in such a way that DispatcherServlet should be invoked for client requests.
- After initialization of spring-mvc DispatcherServlet, the framework will try to load the application context from a file named [servlet-name]-servlet.xml located in the application's WebContent/WEB-INF directory.Name of the file is not fixed and it depend on the value of <servlet-name> element in web.xml.
- Whatever servlet-name is defined in web.xml you need to add "-servlet" in it and corresponding .xml will needs to be created in given location(WebContent>>WEB-INF).In this case our file name should be dispatcher-servlet.xml.
- Next, <servlet-mapping> tag indicates which URLs will be handled by the which DispatcherServlet. In our web.xml all HTTP requests ending with .jsp will be handled by the dispatcher DispatcherServlet.
Step 4 : Create the Controller Class
To create the controller class, we are using two annotations @Controller and @RequestMapping.The @Controller annotation marks this class as Controller.The @RequestMapping annotation is used to map the class with the specified name.
@Controller
@RequestMapping("/")
public class HelloWorldController {
@RequestMapping(method = RequestMethod.GET)
public String sayHello(ModelMap model) {
model.addAttribute("msg","Welcome to javawebtutor Spring 4 MVC Tutorial");
return "welcome";
}
@RequestMapping(value="/greeting", method = RequestMethod.GET)
public String greeting(ModelMap model) {
model.addAttribute("msg", "Greetings from javawebtutor.com");
return "welcome";
}
}
In the above Controller class.
- @Controller annotation marks this class as spring bean which may handle different HTTP requests based on mapping specified on class or individual controller methods.
- @RequestMapping is one of the most widely used Spring MVC annotation. This annotation is used to map web requests onto specific handler classes and/or handler methods.@RequestMapping can be applied to the controller class as well as methods.
- In our case, we have applied it on class level too, which says that this class is default handler for all HTTP requests of type ‘/’.@RequestMapping have several attributes [value,method,params,..] which can be used to narrow down your mapping to more specific selection.
- In our controller class first method does not have any URL mapping declared, so it will inherit the mapping from mapping declared on class level, acting as default handler for GET requests.
- Second method (due to additional mapping declaration with value attribute) will serve the request of form /greeting.
- Attribute method is used to specify type of HTTP request this method can serve. If a mapping does not include "method" attribute, then that mapped controller method will server all types of request on that mapped URL.
- ModelMap is a Map implementation, which provides a way to set/get attributes from/to request or session like request.getAttribute/ request.setAttribute of HttpServlet.
Step 5 : Define the Beans in Spring XML Configuration file
- Create an XML file and name it dispatcher-servlet.xml. This configuration file can be given any name.
- We are using the name spring-servlet.xml for this project. Place this file inside the WEB-INF folder.
- This is the important configuration file where we need to specify the ViewResolver and View components.
<beans xmlns="http://www.springframework.org/schema/beans"
xmlns:context="http://www.springframework.org/schema/context"
xmlns:mvc="http://www.springframework.org/schema/mvc"
xmlns:xsi="http://www.w3.org/2001/XMLSchema-instance"
xsi:schemaLocation="http://www.springframework.org/schema/beans
http://www.springframework.org/schema/beans/spring-beans-4.0.xsd
http://www.springframework.org/schema/mvc
http://www.springframework.org/schema/mvc/spring-mvc-4.0.xsd
http://www.springframework.org/schema/context
http://www.springframework.org/schema/context/spring-context-4.0.xsd">
<context:component-scan base-package="com.jwt.spring.mvc.controller" />
<mvc:annotation-driven />
<bean
class="org.springframework.web.servlet.view.InternalResourceViewResolver">
<property name="prefix">
<value>/WEB-INF/pages/</value>
</property>
<property name="suffix">
<value>.jsp</value>
</property>
</bean>
</beans>
- In the above xml file <context:component-scan base-package="com.jwt.spring.mvc.controller" /> instructs spring container to scan the package (com.jwt.spring.mvc.controller) and its children to detect and auto configure components. For instance, we can annotate a class with @Controller annotation and spring will automatically configure it as a controller class. Due to this auto scanning feature, there is no need to configure controller classes in xml files.
- InternalResourceViewResolver class is used for the ViewResolver.The prefix+string returned by controller+suffix page will be invoked for the view component.As our controller is returning welcome (return "welcome";) so the view will be /WEB-INF/pages/welcome.jsp.
Step 6 : Create the View
- Spring MVC supports many types of views for different presentation technologies, such as JSPs, HTML, PDF, Excel worksheets, XML etc.
- The view part of this MVC example is a simple jsp page, that shows the value of the attribute that was set to the Controller.Create a new folder named pages under WEB-INF and create a Simple JSP page welcome.jsp inside this ( WEB-INF/pages/welcome.jsp).
- This jsp page will simply access the model value sent from controller.
<%@ page language="java" contentType="text/html; charset=ISO-8859-1"
pageEncoding="ISO-8859-1"%>
<!DOCTYPE html PUBLIC "-//W3C//DTD HTML 4.01 Transitional//EN" "http://www.w3.org/TR/html4/loose.dtd">
<html>
<head>
<meta http-equiv="Content-Type" content="text/html; charset=ISO-8859-1">
<title>HelloWorld page</title>
</head>
<body>
<h2>Hello : ${msg}</h2>
</body>
</html>


Comments
Post a Comment